Monday, November 3, 2014

Japanese Indigo - That Irresistible Blue

This spring I sowed some Japanese Indigo. I have done that once before, but only really got one plant to live, but this time I had about eight healthy plants.

They got off to a slow start in the cold and wet Icelandic spring, but once I figured out that I really shouldn't expect a summer and covered them with fleece, they took off and turned into a vigorous bunch.

I harvested them all at the same time in fall and dyed some Alpaca wool with the thought of giving it to my daughter who wanted to make a simple garter stitch shawl.

Here is the method I used. A tutorial of sorts.

I cut the plants, stem and all and take them home.


I remove the leaves from the stems and chop them finely. I do this immediately after I get home. The leaves do not keep well and can not be dried.

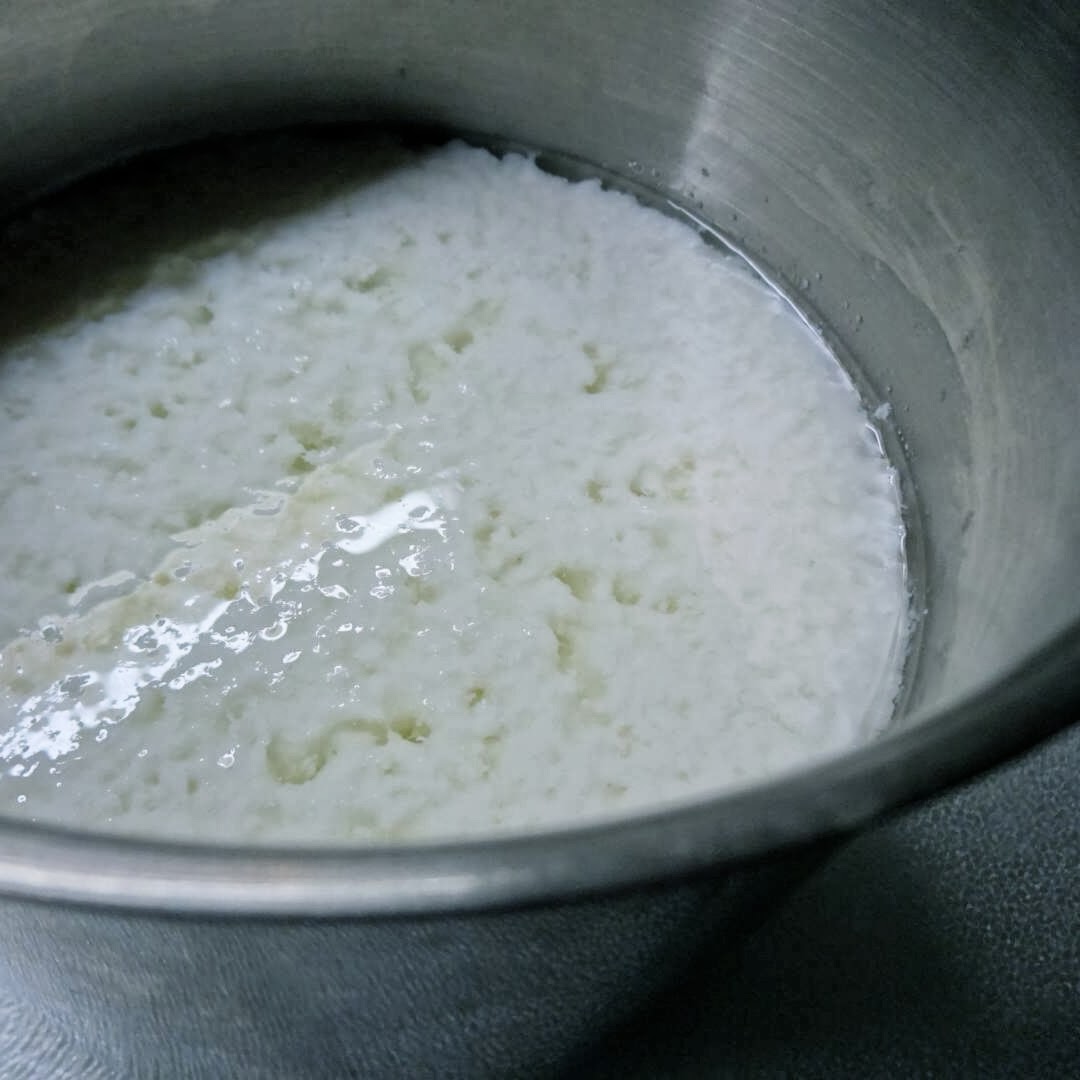
I stuff the leaves into a jar and pour fresh water from the tap over the leaves. I put the jar in a pot - I always put a washcloth in the bottom of the pot - and heat it gently to 50°C / 120°F.

Then I sieve the liquid and squeeze out every last drop from the leaves. This time I actually felt that there was more colour left in the leaves, so I pout some more water on the leaves and heated them again. Just to be sure that I got every molecule of indigo into my dye liquid.
The resulting liquid was dark, dark blue. I was thrilled.

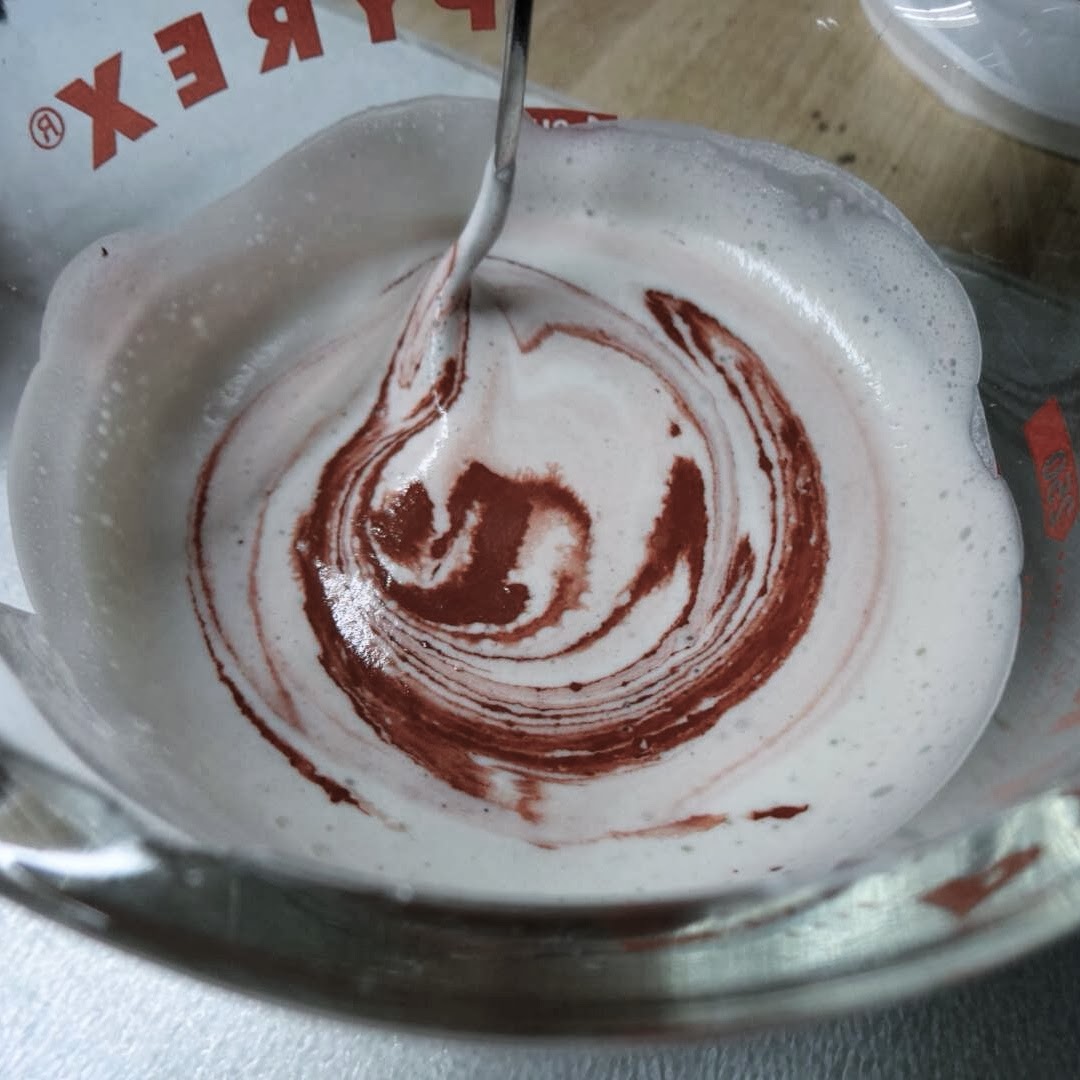
Then it is time for the stick blender to add air to the solution.

This developes the indigo, although it is in an insoluble form.

So the next step is to make the indigo water soluble...


...by adding hydrosulfite or spectrality or colour remover.

I sprinkle about a teaspoonful over the surface and wait 30-45 minutes to see if the liquid turn to yellow. If not I add some more.

Here I had moved the dye liquid to a pot so that I could be sure to keep the right temperature.

I most often put the pot in another pot and heat that. This way I can control the temperature better.
When the liquid turns a green yellow I can carefully add the wool while I am careful not to introduce any air into the solution.

I am careful to have wetted the wool really well before. That means I let it sit in water at least an hour before I dye it.

And with wool and indigo, I make sure that the wool has been sitting in water that is the same temperature as the indigo solution (which is 50°C). I any air into the solution.
I let it sit for 10-20 minutes to get a dark colour. Shorter time for a lighter colour.


Then I pull it up gently and watch the magic transformation.

It very quickly turns a lovely turquoise colour, but that is short lived.

The colour soon developes into the indigo blue.


I shake the wool to air it properly. Then I let it sit for at least the same amount of time that I let it sit in the solution to fully develop the colour.

And then I re dip the wool or put another skein into the dye liquid until all the colour is gone.

The colour gets progressively lighter. But all of them beautiful.

It is very hard to get the japanese indigo to flower in the northern hempishere. But I still have one plant left that I took inside. It hasn't flowered, and I may just cut it down soon and dye from it.

It's such a lovely blue.


Saturday, October 18, 2014

Orange for fall

Orange really isn't my colour at all.  I look like death warmed over, if I attempt to wear it, while my daughter on the other hand, simply glows.  But it is a beautiful vibrant colour that is both happy and energetic. And it is the undisputed colour of fall.

I didn't set out to make an orange soap.  I have been wanting to do a yellow one since early this year.  I was longing for spring and wanted the warm golden yellow that I got from Annatto once.  So I infused Annatto seeds and expected them to turn the oil a golden yellow overnight.  It didn't. I'm still waiting.  Then I thought of the left over unrefined palm oil that is in my cupboards and decided to use that.  I just had to try palm oil once so I bought it even if the environmental effects are questionable.  Since I bought it I might as well use it up, there is no reason to waste it.  

And then, as I was selecting my ingredients I looked at the infused rhubarb oil and decided to blend it in and see if I would get orange. So thus this orange soap. It was fall after all.  

It is a rather small recipe, 500 g / 18 oz. 5% super fat, water 38% lye 70 g / 2.5 oz (but run through a calculator be be sure)

Coconut oil     26%     130 g / 4.6 oz
Rapeseed oil   20%     100 g / 3.5 oz
Lard                20%     100 g / 3.5 oz
Palm oil          14%     70 g / 2.5 oz - Unrefined yellow
Olive oil         10%     50 g / 1.8 oz
Cocoa butter     4%    20 g/ 0.7 oz
Castor oil         3%     15 g/ 0.5 oz
Sunflower oil   3%     15 g/ 0.5 oz - Rhubarb infused

The water was yellow from infusion with Weld, a well known dye plant. I added Sweet orange, Ylang ylang and Litsea cubea for scent.  It traced really quickly and I had to jam it into the mold.  It also heated up quite a bit so I threw it into the freezer after I decorated it with some dried plant material that  was lying around in the kitchen.

It has cured now and it looks like a really nice hard soap.  The lather is rich and creamy and soft.  I have found that the soaps that I put lard in are my favorite soaps.  I also like to put a bit of castor oil, so that I can use it for my hair if I want to.  And that makes for a nice soft lather.

The soap has retained it's orange colour except on the top which has turned a bit pink.  The Rhubarb will not be subdued :).


Friday, September 5, 2014

Black Currant, Red Currant, Ginger and Mint Jelly

I made some red currant and black currant jelly, but really thought there was so much colour and goodness left after I had boiled the fruit and sieved it. So I added some wtaer to both and boiled them again, this time with a little piece of ginger and a handful of mint leaves.

I let it steep for a while, sieved it and added sugar. For 1 liter (about 1 quart) I added a bit less than 1 kilo (about a pound) of sugar.

I used a candy thermometer and boiled it to 104°C / 217°F and then poured it into canning jars. Let it cool. Close the lid and store in the fridge.

It turned out delicious.

Amazing how we always tend to think of everything as single use. Now I have my traditional Red Currant jelly, a traditional Black Currant Jelly and this great new experiment that I got for not a lot of trouble and leftover used berries that were on their way to the compost heap.

Sunday, July 20, 2014

Rose and Orange Blossom Cream

I just suddenly got the urge to make a cream, so I did.  And now I have the softest extremities imaginable.  I haven't made a cream in ages.  No special reason for that.  I think it was that I made so many infused oils and started to use those straight on my face and really liked that.  But this evening I was surfing the webpages that I have in my Blog roll on the right and came across Curious Soapmaker's Rose essence facial cream recipe, all pink and pretty.

So, like scratching an itch, I immediately dove into my cupboards to dig out the cream making stuff.  I resisted the strong urge to add everything but the kitchen sink and chose just one additive, Allantoin, which is a nature identical substance that is derived from the roots & leaves of the Comfrey plant.  I love Comfrey and grow it in my garden.  It has loads of medicinal benefits, mostly due to that wonderful substance.  I have tons of other stuff, but the appeal of the Rose face cream was it's simplicity, so I restricted my use of ingredients this time.

Being, of course, completely unable to follow other peoples directions, my recipe is different from hers,  but I started out with the same proportions as she did: About 20% oils, 6% emulsion wax and 74% water phase.  The proportions changed as I weighed my ingredients because I didn't have as much of as I wanted of the Rose water, but I improvised and added the Orange Blossom water and selected my favorite (at the moment) oils and other ingredients.

The exact recipe (as far as I remembered right after I made it (my process tends to be very organic, I use whatever strikes my fancy at the moment I make things)) is as follows:

Oil phase:
Argan oil               22 g / 0.77 oz
Borage oil             10 g / 0.35 oz
Evening primrose   8 g / 0.28 oz
Peach oil                6 g / 0.21 oz
Lanolin                  4 g / 0.14 oz
Oils total: 50 g / 1.76 oz

Emulsion: I used CreamMaker wax from Making Cosmetics 15 g 0.53 oz

Water phase:
Rose water                      30 g (that was all I had) / 1 oz
Orange Blossom water    90 g / 3 oz
Glycerin                          10 g /0.35 oz
Water                              20 g / 7 oz
Allantoin (from Making Cosmetics) 2 g / 0.07 oz
Water total: 152 g. / 5.3 oz

Preservative: Potassium Sorbate 1 g / 0.035 oz

I knew I wanted the oil phase to be mostly Argan oil.  It's simply lovely on the face as well as the hair.  And then I found the Borage oil and Evening Primrose, both of which are very nice.  I wanted to add Lanolin since I'm not allergic to it and it's just the best softening ingredient for the skin.  This much I know from spinning raw wool.  I just love the way my hands get all soft from the Lanolin in the wool.  The Peach oil I used to fill up the quantity.

I dug out the rest of the Rose water I knew I still had from the Italy visit and weighed it, only to be slightly disappointed there wasn't more of it.  But I quickly decided to use Orange Blossom water since I love that scent and I had some sine my last time in Paris.  And I wanted to use Glycerin. I like that as a humectant. And then I filled up with water so the scent would't be overpowering.  I didn't have any beetroot powder, but I had beetroot, so I cut of a small sliver and put it in the water phase along with the allantoin and the preservative.

Then I heated both the oils and the water up in a water bath and whizzed it together using a stick blender.  I added quite a bit of Rose Maroc essential oil which I had in a diluted form (5% with coconut oil) and a little bit of Neroli oil until I liked the combination of the two scents.

I now have several weeks supply of the loveliest light and airy pink face cream which I put into the two wonderful Onix cream jars my little sister gave me for Christmas.  They have been begging for something luxurious and this cream just fits the bill.  I put the rest into two small metal jars and three plastic pump dispensers ready to go to the gym with me.

And now I really want to make a soap to go with that cream.  Since I almost used all my Rose Maroc oil I guess I'll use some Rose Geranium or maybe Rosewood.  And since it begs to be pink, it would need to have Rhubarb root oil...

Sunday, June 22, 2014

The embroidered velvet - Baldýring


One of the most beautiful parts of the national costume is the embroidery. Embroidery is used extensiely in the oldest form of the costume, Faldbuningur.  There is a large flower border on the skirts, although it was also known to make them without embroidery, but with velvet lines instead.  The embroidery can be of two different types, Skattering and Blómstursaumur.  The latter is a special Icelandic embroidery stitch, very pretty, but I do not know the origin of the other one or if it is known in other countries.

And then there is the embroidery on the velvet borders of the vest, and on the jacket of the Faldbuningur. That is always done in an embroidery technique called Baldýring which is known as Gold embroidery in English.  In the older costumes it was done either with gold and silver thread or with silk.  I love the silk myself because it is so colourful.

I took a course in Baldýring and I am making the border for the vest.  It is not an easy technique to master, but I found that sewing the twisted gold threads down was fairly easy.  The Baldýring itself is not and I need to practice a whole lot before I can tackle the real thing.

Making the borders is quite involved and I want to write it down so that I do not forget it.  And also so that others can know how to do it.  I really think it is important to share knowledge, especially about old handwork and methods because they might so easily be lost.

So here is the start of a tutorial for making the velvet borders.  Since I am making the 19th century version, it will mostly talk about that, but I will put in notes about the differences in that and the 20th century version when appropriate.


The borders themselves are made from 3 layers, 2 good quality fabrics and a parchment or cardboard :

8 cm x 25 cm - Black cotton velvet
5 cm x 25 cm - Acid free light to medium stiff cardboard (it must be flexible) or parchment which is what was used in the old days
5 cm x 25 cm - Thin white cotton material

Cut two of each, one for the right side and one for the left.

The needles that are used are very fine needle nr. 9 or 10 for the Baldýring itself (the same type that as is commonly used in quilting). And also a nr 7-8 for general sewing. And a very large needle for the gold twisted threads.


The borders for the 19th century vest are 4-5,5 cm wide, the length varies slightly with the size of the vest, but it should be cut around 25 cm long.  It's finished length depends on the vest on which it is eventually sewn.

For the 20th century costume, the border is wider, about 8,5 - 10 cm, depending on the chest measurements of the woman. The length is the same.


The thin white cotton is stitched to the cardboard around the edges. This can be done by hand or machine. There is no need for a seam allowance.

Mark the direction of the nap with an arrow, so that you don't get confused and make sure to have the two borders, left and right, facing in the same direction.


The black velvet is faced right side down (away from you), and the nap facing up.

The white cotton/cardboard is then placed on top of the velvet, cotton side facing up.

Center the white cotton/cardboard sideways (horizontally) on the velvet. The length should be equal for both pieces.


The edges of the velvet are wrapped around the cardboard and the velvet is pinned in place.

Make sure you do not pin into the cardboard.

Stitch the edges of the velvet to the white cotton, using overcasting and taking care to stitch only the white cotton and velvet.

Do not puncture the cardboard itself.
Next you need to cut out a piece of thin paper to be 8 cm x 30 cm. Architectural tracing paper works really well.

This paper is wrapped around the velvet and stitched in place with a running stitch, this time going through all layers, puncturing the cardboard.

This paper serves to protect the velvet from getting dirty while being handled when embroidering.


The last step before you can start the actual embroidery is to stitch the line drawing of the flower pattern in place.

Be careful to leave enough space above the pattern, at least 4 cm.

The line drawing is traced onto a thin mylar type of paper.

The stitching is done with a running stitch all the way around the rectangular shape and also around the shapes to be embroidered, through all the layers.

And now you need to make another one, with the drawing mirrored.


There are a number of patterns one can use and a multitude of colours, so the choice is not easy.  I went through a whole lot of patterns before deciding to draw my own.  Some of the patterns are quite old, while some of them date from the early 19th century.  But that is the subject of the next post.

Thursday, May 8, 2014

Spring in the North - So much better.

I've been like a mad woman in the last year or so, taking courses in all kinds of strange things.  Mostly old handiwork.  This is not typical of me.  It's kind of not at all like me.  I have always told myself that I can't be taught.  I'm too impatient and arrogant to take instruction from others.  Or so I have always thought.  But it turns out that I can actually listen to what others say and learn from them.  Of course I knew that.  It's not like I haven't learned everything I know from other people.

I spent last weekend with eight women in the north of Iceland, at an agricultural college learning to weave on a warp weighted loom.  This is the old looms that basically date from the stone age and were used right up until 1750 in Iceland.  By that time, weaving had, in Europe, long since become a matter of Guilds and was the domain of men.  Except here, where the vertical loom was found at every farm and women wove every piece of cloth that was used.  And all the yarn used to weave was spun on a drop spindle too.  Right up until the 1750 there were no spinning wheels in use in this country and no horizontal looms.  So it may come as a surprise that this method of weaving has almost become lost in this country.  But now there are at least 8 of us, who know how.

Maybe it doesn't matter that the old ways of doing things get lost.  Some people don't seem to mind.  Maybe most people don't mind.  I don't know.  I have no idea why this had started to matter to me.  But I feel privileged to have been a part of the small group that got to learn this.  And it's not that I was chosen or anything.  I just happened to hear about this course by chance and immediately got interested and signed up.  They needed six people, but had to cancel because they couldn't fill the spaces.  Even if I offered to sign my mother up if needed.  So I kept telling everyone about it.  In the end they had a waiting list.

This really is a most satisfying way to weave.  The loom doesn't take much space.  One can take it down and put it up again, without finishing the piece.  Something that can not be done in the modern looms.  The construction is quite simple and it's not really hard work, although progress is undoubtedly slower than on horizontal looms.

We wove with tufts of "tog" to make a type of cloth that was used in Viking times as a warm and waterproof outer clothing.  It made for a shaggy fabric that hippies would have been proud of in the sixtees.  But my little piece may end up as a cushion cover one of these days.

It took about 7 hours to set the looms up and then the going was slow since we were two to each loom and had to co-ordinate our weaving.  We all did pretty different pieces, some using the natural sheep colours and others using natural dyed wool.  One can weave quite complicated pieces on this loom, twill being the very traditional Icelandic fabric that was so well known in the olden days and was exported in large quantities.  Twill uses 3 shafts on this loom, but we only used one shaft and did a pretty basic basket weave.

I fell in love with this type of weaving and I'm almost planning to build a loom in the garden.  They really look quite good, rustic and solid structures made of sturdy branches and woods.  It would make for a really cool garden sculpture.

Thursday, March 27, 2014

I Hate Winter

Did I ever mention that?  I'm not sure that I did.  Winter here is quite all right up until New Year's day. Then it gets really depressing.  Even if it starts to get lighter, the weather is miserable and I think it's worse with the light.   In the deep darkness of winter it makes sense to crawl into bed, light some candles and just snuggle and then put up Christmas decorations and celebrate.  But you kind of expect the lighter evenings to turn into warmer days.  But... No!  It's not happening.  Not in March. Winter here doesn't leave until mid to late May or like last summer, June.  We had frost almost into the middle of June and after that it just rained.

The old Icelandic calendar only had two seasons, Winter and Summer.  It makes sense in this climate since there really isn't any spring or fall.  There is just that small window of opportunity when growth bursts forward and desperately tries to set seed.   It hardly deserves the name summer.

The best way to ignore the miserable weather is to draw the curtains, light a few candles and knit.  I have been working on this triangular lace shawl.  It's a fairly well known traditional pattern, called Þórdís, and is available for free on Knitting Daily.  I had originally intended to make a shawl called Halldóra, from a wonderful book, Icelandic Handknits but after frogging that from the 19th row about 6 times, I gave that up.  The pattern just didn't seem to stick in my mind.  I was getting so frustrated that my daughter suggested this other one and I like it even better than the first one.  Both are very much traditional Icelandic shawls.

In the olden days all women used shawls instead of sweaters.  They were most commonly triangular and quite big.  Not always as delicate as the one I am making, the daywear would have been quite plain and the women would wrap them around themselves and tie the ends at the back.  Sunday best, would have been spun from the silky tog, or the soft þel into very delicate creations.  The finest of which one could draw through a finger ring.  Or so the stories tell.  I saw a few of them hanging in a museum last summer and they looked so etherial.  I especially loved the green colour and knew I wanted to dye the yarn myself.  And I knew that I wanted light and delicate colours for my shawl, even if I have seen some really beautiful ones in the natural sheep colours, both greys and browns.

I haven't knitted much lace patterns before and I have to say that it does make sense to use lifelines and A LOT of stitch markers.  I didn't at first and that resulted in some frogging.  So I have learned my lesson.  The yarn I used is Love Story, a lovely single spun Icelandic wool made by a lovely french woman who now lives in Iceland. It is a combination of the þel and tog and is such a lovely, lovely soft and delicate yarn that it is a plesure to touch it.  Helene, a former lawyer, is a textile designer and has done great things with the Icelandic wool.  She has a blog, The Icelandic knitter and a webstore.  I love everything she does.

I did dye the yarn myself and I have to admit that I am absolutely in love with the colours.  I used cochineal for the pink, woad for the blue and green (with weld) and then Parmelia saxatilis for the yellows.  That yarn has the wonderful smell which I love.  That is the main reason  used that colour.  Just to get a small whiff that will last as long as the garment.  I dyed this yarn at the same time I dyed the silk for my embroidery.  I had plenty of dye left over from those tiny amounts so it made sense to do that at the same time.  I was really pleased with the outcome.  The colours just make me smile and give me the promise of a spring that will surely be here soon.

Sunday, February 23, 2014

The Day of the Woman - First Day of Góa

Today is the first day of the old Nordic month Góa.  Góa is thought to have been a goddess is the old Nordic religion, but nothing is known of her other than the first day of her month is dedicated to women.
The name is konudagur in Icelandic, but kona is the word used for both woman and wife.

Similarily, the first day of Þorri, the previous month, is dedicated to men or husbands.  The name is bóndadagur, and bóndi means farmer or man as in the ending of the Icelandic word for husband, húsbóndi.

Those days are still celebrated here and they are much more traditional than Valentines day, mothers day and fathers day, all of which are imports by flower merchants.  Both days are celebrated gratulating the wife or the husband on the occasion of the day and it is now traditional to give flowers as a present.  In the olden day the husbands were supposed to hop around the farm on one leg, wearing only their shirt, but dressed in one pant leg, draging the other behind.  No similar feat was required of the women, as far as I know.  Not surprisingly, few (if any) men keep to this tradition today.

But anyway, today I get flowers from my hubby and a cake from the bakery.  All of which I am grateful for.  But I have to admit that I am a bit more excited about the flowers that I am in the process of making myself.  The wonderful flower borders for the national costume.  I had a hard time deciding on a pattern and ended up drawing my own, using elements from older patterns.

I really wanted to have flowers that I know and like and most of the patterns were too stylized to be recognizable.  Haveing been brought up by my biologist parents and taught about plants from an early age, I didn't want that.  So I searched for flower patterns that were recognizable and made a sketch of those.  The flowers I chose were Eyrarrós / Dwarf fireweed (Epilobium latifolium) at the top.  It is a member of the Evening primrose family and the national flower of Greenland.  It is quite magenta in colour and I used Cochineal to dye the embroidery silk pink.   I also love the tiny blue flowers of Gleym-mér-ey / Forget-me-not (Myosotis arvensis) and Woad blue captures the hue of those beautiful little flowers perfectly.

I also wanted to use Holtasóley /Mountain avens (Dryas octopetala) a member of the rose family, with eight white petals and a fairly large yellow middle.  It is the national flower of Iceland, but since white is never used in the special embroidery, that posed a problem.  I toyed with the idea of making it yellow, but gave that up altogether.  Instead I settled for two indistinct half opened buds from and old pattern.  That could be the common buttercup and I dyed a strong yellow with Weld and a darker one using lichen.  And at the bottom I put a half opened Eyrarrós again to repeat the pink.  The flowers are emerging from a flower pot, a well used symbol of the 18th century and a very common feature in many of the older patterns.  For the flower pot I intend to use both gold embroidery and the lovely golden yellow from the lichen Parmelia saxatilis (Shield lichen, or Litunarskóf in Icelandic).  It is the one that gives the lovely aroma.

I really like the outcome and look forward to starting to embroider this.  Dyeing all the colors wasn't as much trouble as I had feared and I love the outcome.  They are just gorgeous.  And since I also plan to knit a traditional triangular woolen shawl, I used the opportunity to dye the very fine wool for that, since the tiny amount of embroidery silk left me with plenty of dyeing liquor left to use.  Those colours also came out beautifully.  I have to admit that now I am getting really impatient to get the full costume.

The process of embroidering is the same as is used in Gold embroidery.  The Icelandic tradition uses both silk and silver and gilded silver thread.  I love the colorful silk and it was used on the older types of costumes and it really pops with the background of black velvet.  I have been attending a course in learning to embroider in this way and it does take a lot of time and practice.  The process of making the flower borders is also quite involved and laborious.  But hopefully well worth it once it's all done.


Thursday, January 30, 2014

Milk Paint - How Cool Is That!


I heard about milk paint a few years ago and was really excited.  Paint made from milk!  Wow!

I immediately made plans to make some and test it out.  However I lacked some of the material and the plans were put on hold until I had gotten hold of them.

I ended up ordering some stuff from Kramer pigments in Germany (they apparently also have a shop in the US), but never really did anything with it.  But the other day I got an excuse to start that process again and made some paint.

I want to refinish some dining chairs that I got for little money in a thrift store.  I have plucked away the old and ugly fabric that covers them and am working on sanding the frames.  I want to paint them with milk paint in an ivory or creamy colour and upholster them in linen.  I have a thing for linen these days.

Milk paint is made from milk, lime and pigment, sometimes with the addition of Borax.  The Borax helps the lime dissolve the casein protein in the milk so it makes for a smoother paint as well as provide some preservative qualities to it.  But milk paint spoils easily so it should be used within a few days once it is mixed. Store it in the fridge in between uses, but let it reach room temperature before painting with it.

Milk paint adheres well to fresh wood and will give a strong and durable finish.  It is a very good alternative to the plastic water based paints that are available.  

For this recipe use 1 liter non-fat milk, ½ cup vinegar. 1 tsp borax and 1 cup of lime putty.


Let the milk and vinegar be at room temperature before your start.

Stir ½ cup of white vinegar into 1 liter (about a quart).  Stir to mix the two liquids, but do not stir for long.

Let it sit still at room temperature overnight so that the milk protein curdles and separates from the whey.  This is very similar to making cheese btw.  


The next day the curds should have formed and separated from the whey.

Line a sieve with cheesecloth and strain the whole lumpy mess.

After the whey has been separated then from the whey (which is discarded in this instance) the curds are given a good wash in cold water to wash away all the whey.

Strain.

Do this three times in oder to remove all vinegar and whey from the curds.


After a thorough washing the clean curds are strained well.

I did this by tying the cheesecloth (ok, I used a cloth nappy) above the sink until only a few drops are dripping from the cloth.

Scrape the curds into a bowl.

Now take a stick blender to mix in 1 tsp of Borax.  This helps to get a smoother mix and also acts as a preservative.

Add the lime putty and stir with the stick blender.

Now measure out the pigment.  I split the milk paint mixture into 4 parts and measured 1 tbs of pigment for each part.

The pigments needs to be mixed with water prior to mixing into the milk paint mixture in order for it to disperse properly.

Mix it with equal amounts of water and let it sit for a bit before adding it to the paint.


My colors came from Kramer pigments as did the lime putty.

I used a lovely earthy red, yellow, green and gray.  All natural and sumptuous colours.

Let the paint sit for 15-20 minutes and then start to paint.

It is best to use milk paint on a freshly sanded surface, where it will adhere well.

It dries very quickly, so one can paint several layers without having to wait forever for it to dry in-between.

The amount of pigment does matter to the saturation of colour.  They will dry lighter than they look, but the colour can be adjusted by the addition of more pigment.

The colors do tend to be soft and old fashioned, which is part of the charm.

To finish off the painted surface, it can be waxed with beeswax or furniture wax or alternatively given a final coat of a transparent glaze made of milk curds and linseed oil.

To make the glaze, make the curds as above, but do not add borax or lime.  Instead drizzle linseed oil into the glaze as you use the stick blender to mix.  Add pigment if you wish to tone the glaze.  The pigment always needs to be slaked, which means: Measure equal amounts of water and pigment and let sit for an hour.  Use this to glaze over the paint.  Let dry.

Sunday, January 19, 2014

Nut Crispbread

I went on the GAPS diet just over a year ago.  I did it mostly because I was disgusted with arthritis drugs and decided to do something myself to get rid of the pain in my body.  I have osteoarthritis and fibromyalgia, the former causes pretty constant pain in my hands and the latter makes me feel, on occasion, like I was hit by a truck.  The drugs that are used to treat those pretty much all have in common the danger of the patient's heart stopping or the patient having a stroke.  Neither of those is preferable in my opinion.  So I did GAPS by the book, intro and all.  I planed to be on the diet for the prescribed 1.5 years and then, hopefully, I would be in less pain.

I loved the diet.  It really is very much like the traditional Icelandic diet used to be for centuries.  Lots of meat, some vegetables, fermented dairy and pretty much fermented everything. Fermentation by whey was one of the best preservation of food possible here.  So I felt great.  I lost weight rapidly and noticeably a lot of water weight, which I could feel, made my joints much easier to move.  So I was very happy on that diet.  I ate so much good food and I was never hungry.  People felt sorry for me, but I was happy as a lark.  Yumm!

Then hubby and I went on a vacation and I started cheat and eat bread when we were in Italy.  Two days later I realized, that the pain had returned.  Returned!  I hadn't even consciously noticed that I had had no pain in my hands for weeks.  I had just noticed that I felt great.  Anyway, for those who are interested in trying this diet there are many books on the subject as well as websites.  Here are some of the ones I found useful: The Nourishing Gourmet, Keeper of the Home, The Healthy Home Economist, Gaps Diet Journey and of course this: Gaps.me.

There was only on thing that I found incredibly difficult on this diet and that is not eating bread.  I love bread with butter and cheese.  Especially my own fresh baked sourdough.  But that isn't allowed on the GAPS diet and I was doing it correctly.  By the book.  So no bread.  No toast.  And I missed my toast.

But then I discovered that one can make crisp bread with nuts.  And it's very easy.

I use a variety of nuts, just depending on what I have in the cupboards.  I also like to include seeds, like sesame and pumpkins seeds.  I just eyeball it into my food processor, but a typical recipe might look something like this:

½ cup Almonds
½ cup Pecans
¼ cup Hazelnuts
¼ cup Sesame seeds
¼ cup Pumpkins seeds
1 TBS Salt
2 large (3 small) Eggs

Put the nuts, seeds and salt into the food processor and pulse until the mix is very fine.  I usually mix the eggs into this in a bowl by hand because the mix is fairly dry and I have a very small food processor.  I put half of this mix on a silicone sheet and roll it out using baking paper on top.  I roll it out to make it pretty thin, but it is a matter of taste.  This amount of nuts will make two sheets for me.

Bake at 180°C /360°F for about 20 minutes (depending on thickness) until the edges are golden.
Cut while still hot into the size that suits you.

This will keep for at least 2 weeks on my countertop, but I usually eat this within the week :)

Sombre colours

I bought this fantastic linen yarn on a cone. It was quite fine and I usually like chunky yarns to knit.  But I love linen and this was a...